Businesses can do a lot when they know what their customers like, dislike, or look forward to purchasing. But it is easier in traditional brick-and-mortar businesses where you can physically gauge their behavior and purchases.
What about online businesses like eCommerce? How do you know what demographics of visitors purchased your products? Did they leave their checkout incomplete? Is a particular pay method failing repeatedly, leading to abandoned carts?
This is where GA4 comes in.
An Overview of GA4 eCommerce Tracking and Its Benefits for Online Businesses
GA4 is Google’s latest analytics platform that collects information based on various touch points from websites and apps. This includes events like when a user logs in, searches for a product, completes a purchase, etc.
GA4 provides a visual representation and keywords or search queries that bring prospects to your site. It also offers a wealth of data on user behavior, conversion rates, and revenue generated by your eCommerce activities.
The benefit of the extensive data points is you learn how visitors and customers interact with your products. With GA4, you can gain valuable insights into customer journeys, identify critical touchpoints, and optimize your website for maximum conversions. It’s like having a radar that guides you to make data-driven decisions, enabling you to understand your customers better and improve your bottom line.
Introduction to Google Tag Manager (GTM) and Its Role in eCommerce Tracking
Google Tag Manager (GTM) allows eCommerce website owners and managers to track ecommerce tracking GA4, user behavior, and collect website data by managing the tags. These tags could have varied uses like form submission, conversions, items added to a cart, links, or button clicks.
GTM simplifies creating and inserting tags or small website codes to track any triggers without modifying website code. GTM eliminates unnecessary code to your website by injecting code only when triggered. GTM fetches the tag, which contains a JavaScript code associated with the action. By executing a tag on-demand, there’s little website code piled, ensuring a faster website.
However, the setup with GA4 is a bit different from UA. Let’s take a look at some of the similarities and differences.
Schema Changes
Google Analytics 4 (GA4) and Universal Analytics (UA) have significantly different schemas. In comparison to UA’s pageview-based architecture, GA4’s event-based data model provides greater customization in monitoring and reporting.
Also, while setting up an event, you need to pass through different schemas like pageviews, items, products, etc.
For instance, in UA, we could pass the product name as “name,” but for GA, we need to use “iteam_name.”
Adjustments need to be made while setting up events and transferring pertinent data due to this change in naming standards, which affects many schemas such as pageviews, items, and goods.
Data Layer Implementation
It is time to change your data layer to accommodate the new schemas, but hold on a second. Also, do not switch to your online store’s latest version of Universal Analytics. This is because upgrading to the new schemas may create incompatibilities with your existing (Universal Analytics) infrastructure.
As a plus, Google will automatically convert your Universal Analytics events to GA4 App + Web custom events, and most of the schemas are backward-compatible. Updating your configuration to include GA4 App + web-specific dataLayer and schemas together with existing schemas is the best way to maintain both versions of analytics active and operating.
Compared to its predecessors, GTM drastically reduces errors on the website due to incorrect or incomplete website code placement. Using various triggers and events, GTM helps to capture valuable information about your website and app visitors, understand which products your visitors view frequently, and how your product placements impact their purchases.
Setting up GA4 eCommerce Tracking in GTM: Step-by-Step Instructions for Mapping eCommerce Data to GA4 Parameters Using GTM
While integrating the e-commerce store, it will be necessary to define or modify our DataLayer on the page, which will need additional programming time to reflect the new data. You may have the DataLayer implemented by your developer if you aren’t comfortable with the development process. Once the DataLayer variable is specified, it may be set up in GTM.
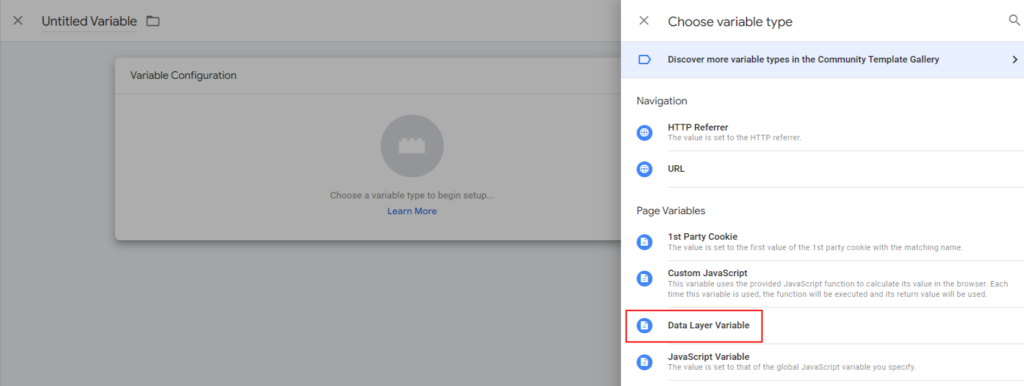
To create a DataLayer variable for eCommerce, do as follows.
Step 1: Navigate to the “Variables” section of your Google Tag Manager console’s left sidebar.
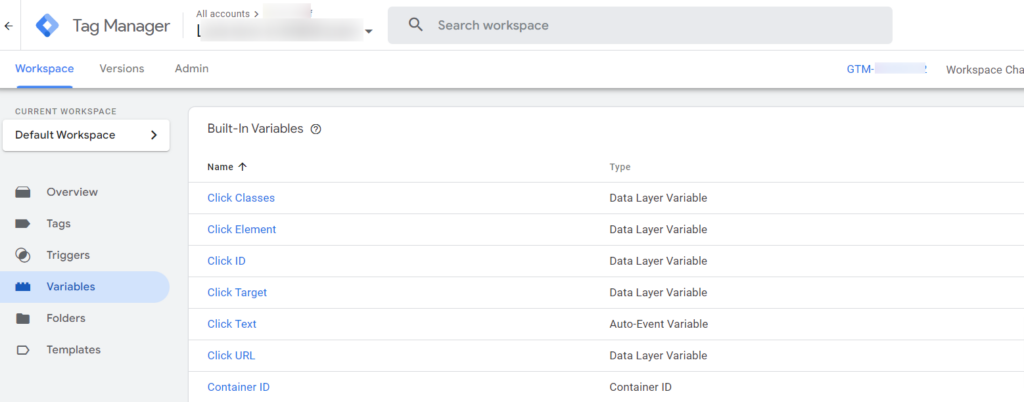
Step 2: Select the ‘New’ tab next.
Step 3: Click “Variable Configuration” after giving your variable a suitable name.
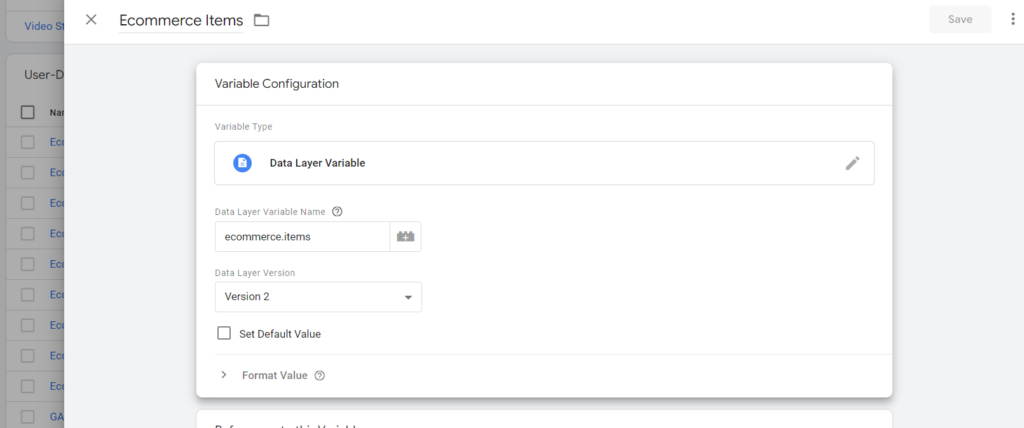
Step 4: A new window will open on top of the current one. Select the variable named “DataLayer.”
Step 5: A window showing a variable configuration like the one below will appear. Assign the name “ecommerce.items” to the DataLayer variable slot.
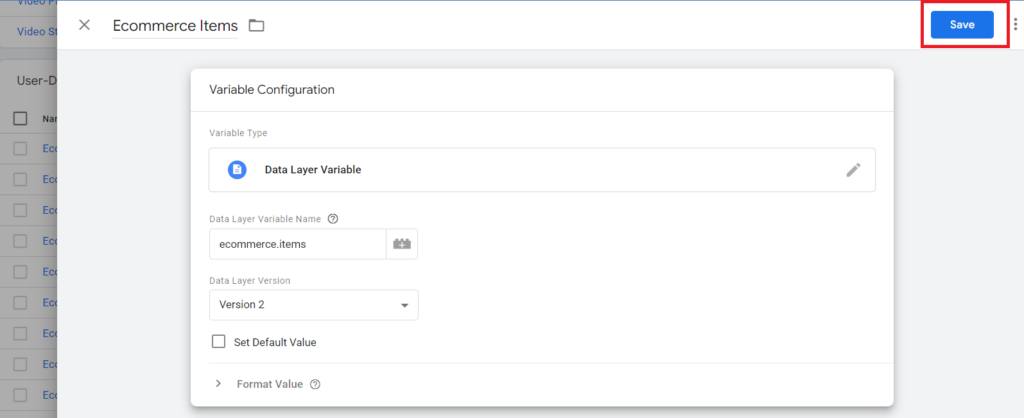
Stop: Press the “Save” button.
We can now go on with implementing comments after we have configured our Layer variable. We will measure the standard eCommerce events. Let’s start with this subject by looking at the part below, where you’ll find information about the DataLayer code, GTM configuration, and trigger condition.
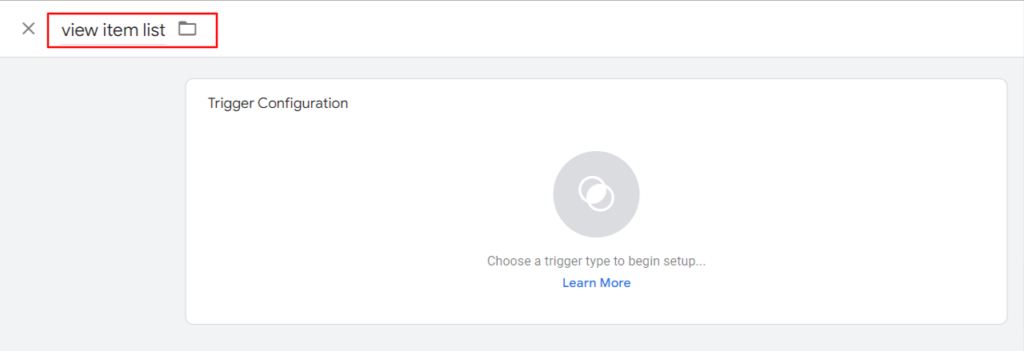
1. Product/item list views
Product awareness will be gauged during this function. This element must be activated everywhere a product rotator is shown, such as the homepage, category pages, etc.
DataLayer configuration:
Views and impressions of item lists may be tracked by sending a list of goods and their attributes to the data layer in the form of a ‘view_item_list’ event.
dataLayer.push({ ecommerce: null });  // Clear the previous ecommerce object.
dataLayer.push({
  event: "view_item_list",
  ecommerce: {
    item_list_id: "related_products",
    item_list_name: "Related products",
    items: [
     {
      item_id: "SKU_12345",
      item_name: "Stan and Friends Tee",
      affiliation: "Google Merchandise Store",
      coupon: "SUMMER_FUN",
      discount: 2.22,
      index: 0,
      item_brand: "Google",
      item_category: "Apparel",
      item_category2: "Adult",
      item_category3: "Shirts",
      item_category4: "Crew",
      item_category5: "Short sleeve",
      item_list_id: "related_products",
      item_list_name: "Related Products",
      item_variant: "green",
      location_id: "ChIJIQBpAG2ahYAR_6128GcTUEo",
      price: 9.99,
      quantity: 1
    },
    {
      item_id: "SKU_12346",
      item_name: "Google Grey Women's Tee",
      affiliation: "Google Merchandise Store",
      coupon: "SUMMER_FUN",
      discount: 3.33,
      index: 1,
      item_brand: "Google",
      item_category: "Apparel",
      item_category2: "Adult",
      item_category3: "Shirts",
      item_category4: "Crew",
      item_category5: "Short sleeve",
      item_list_id: "related_products",
      item_list_name: "Related Products",
      item_variant: "gray",
      location_id: "ChIJIQBpAG2ahYAR_6128GcTUEo",
      price: 20.99,
      promotion_id: "P_12345",
      promotion_name: "Summer Sale",
      quantity: 1
    }]
  }
});
Google tag configuration:
After the above code has been uploaded to the DataLayer, your tag must be set up. The steps for doing so are outlined below.
Step 1: Go to the ‘Tags’ section of your Google Tag Manager dashboard after logging in.
Step 2: Choose’ New’ from the drop-down menu to add a new scroll event for the GAA property.
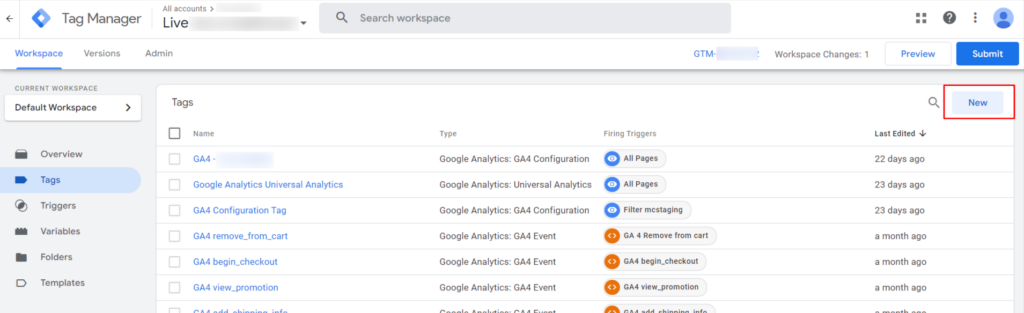
Step 3: Name your tag and go to the ‘Tag Configuration’ tab.
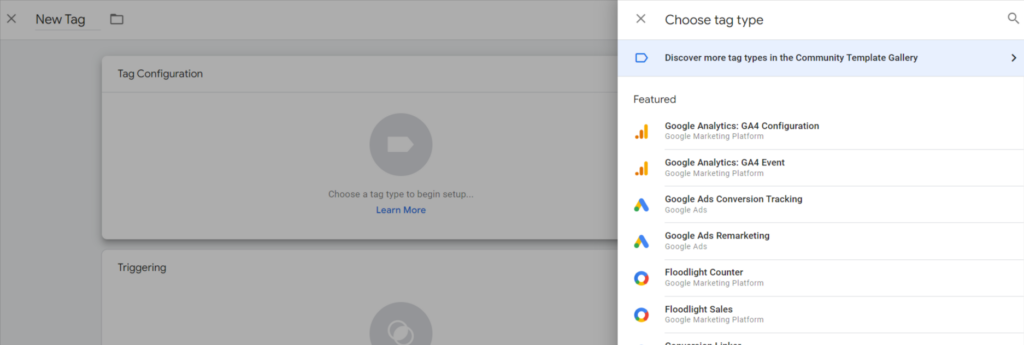
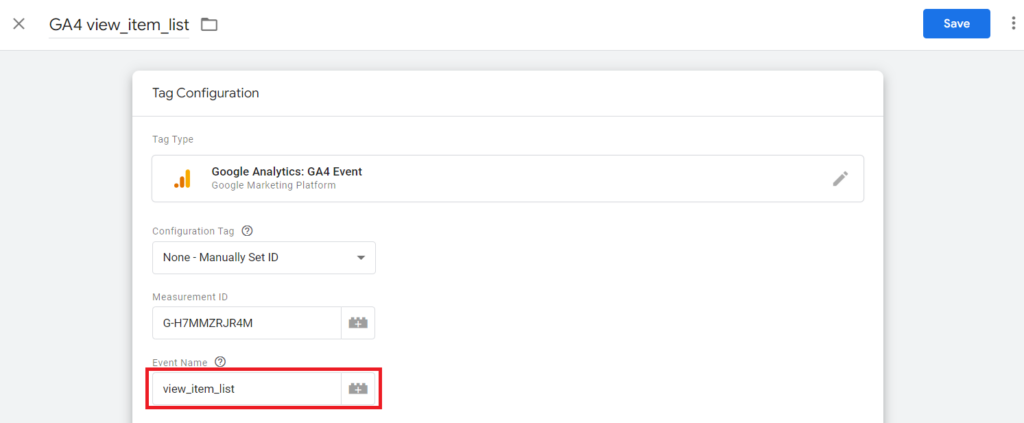
Step 4: On the right, an overlay will load with pre-made tag templates. Pick GA4 Event in Google Analytics.
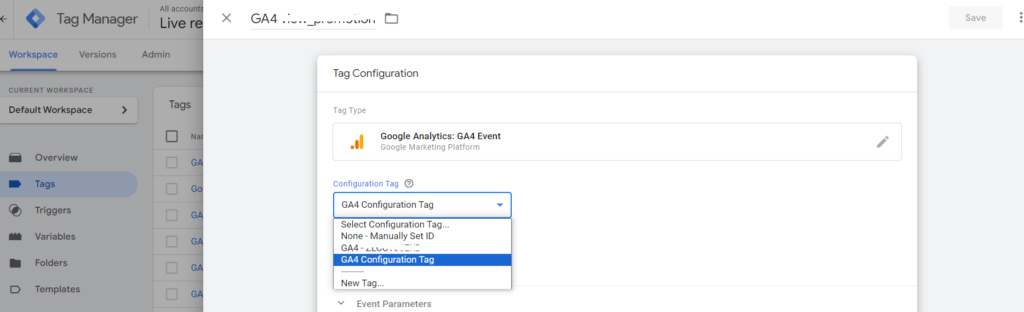
Step 5: Below is an example of the tag configuration window that will appear. Use the “Select Configuration Tag” option.

Step 8: A selection option will drop down. The ‘Non-Manually Set ID’ and ‘Page Tag’ drop-down menus provide you the option of specifying the ID of your page automatically.
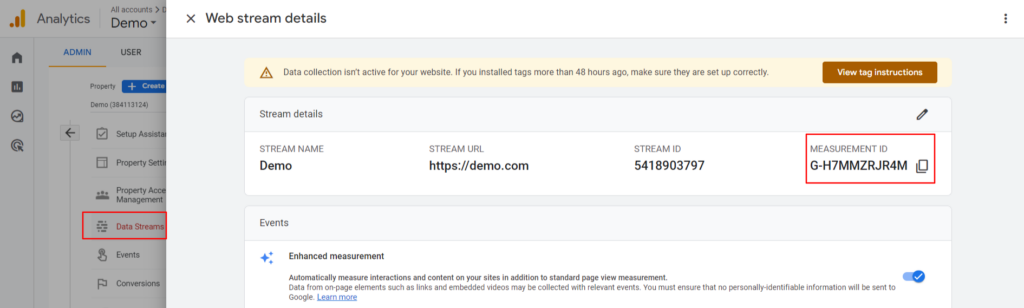
Step 7: The next thing to do is fill the input box with the GA4 measurement ID. The ID may be seen in the Data Streams section of your administration dashboard.
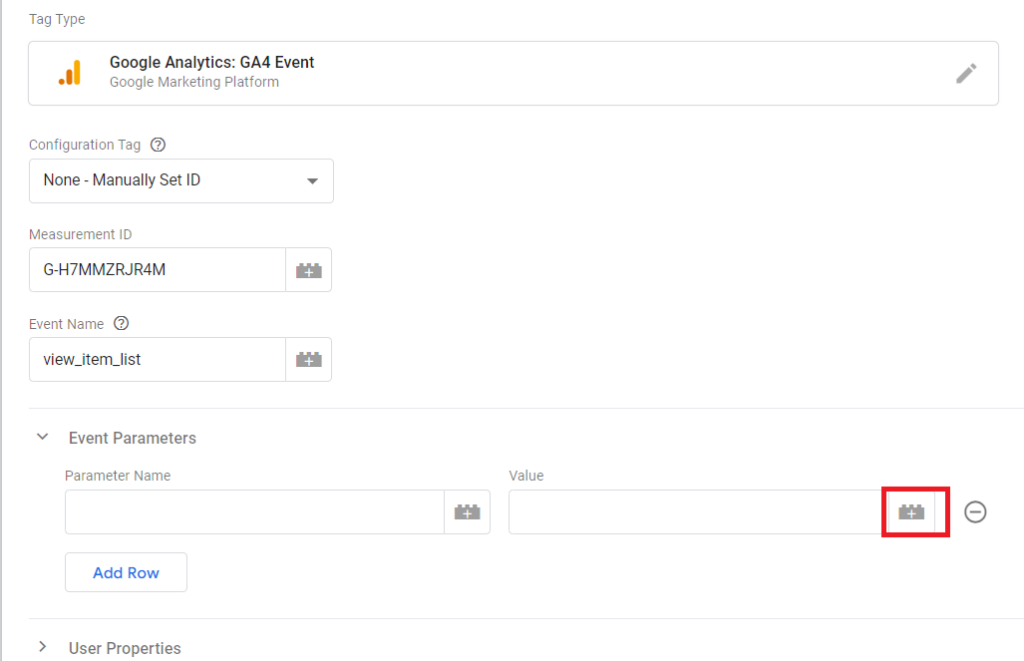
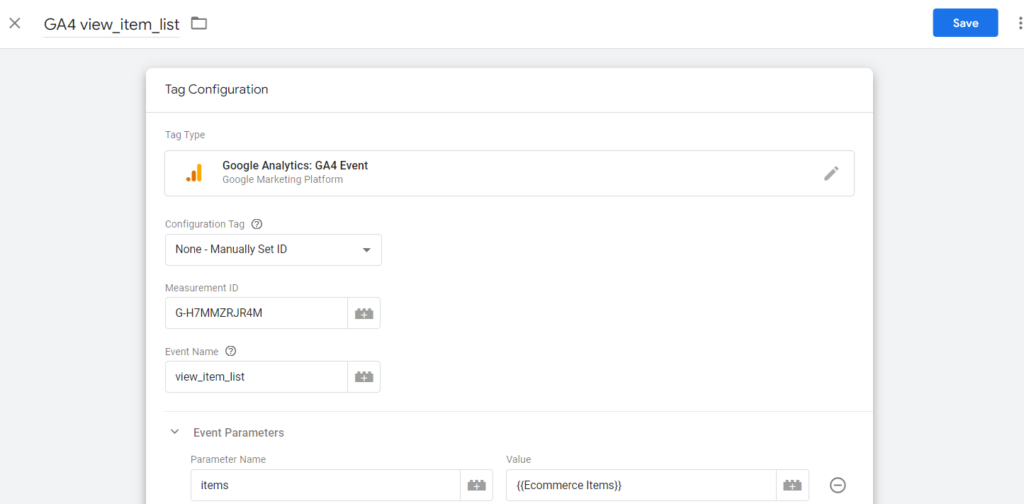
Step 8: Please identify the function by name. Your GAA analytical reports will show the name you provide for this event. Afterward, label a happening as “view_item_list.”
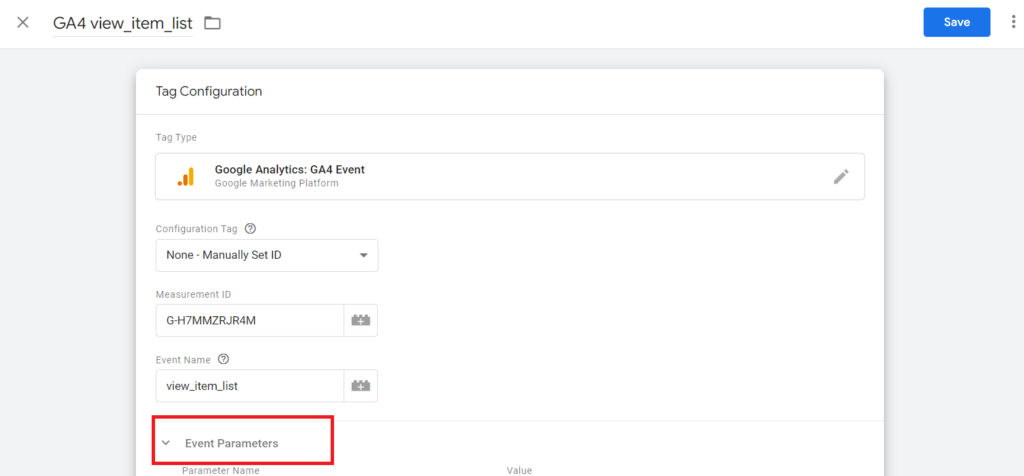
Step 9: The ‘Event Parameters’ option will become available after you choose it from the drop-down menu.
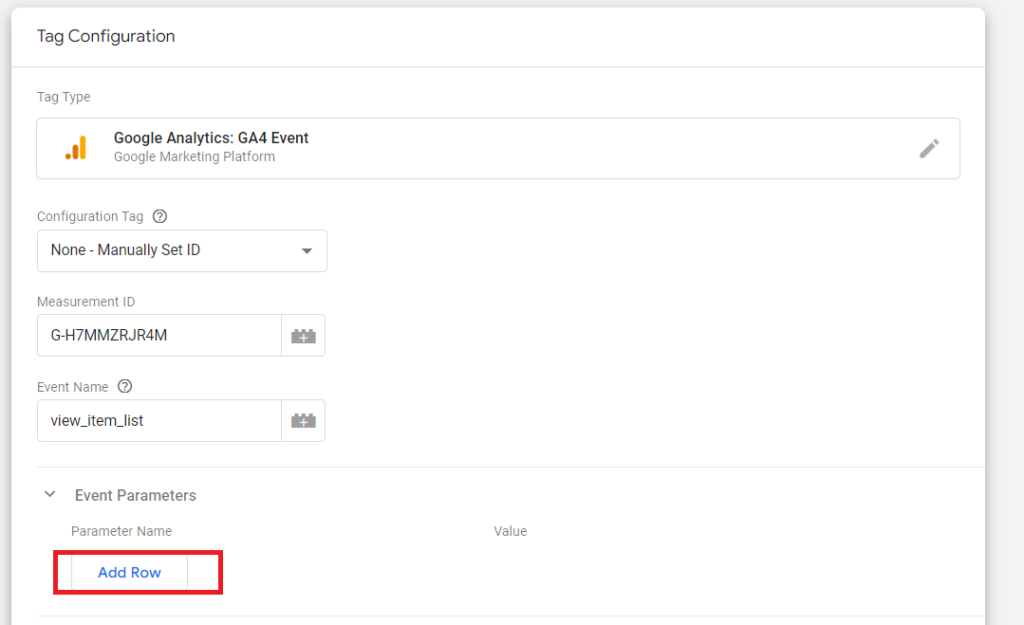
Step 10: The “Add Row” button must be selected.
Step 11: Enter the ‘items’ parameter in the ‘Parameter Name’ field.
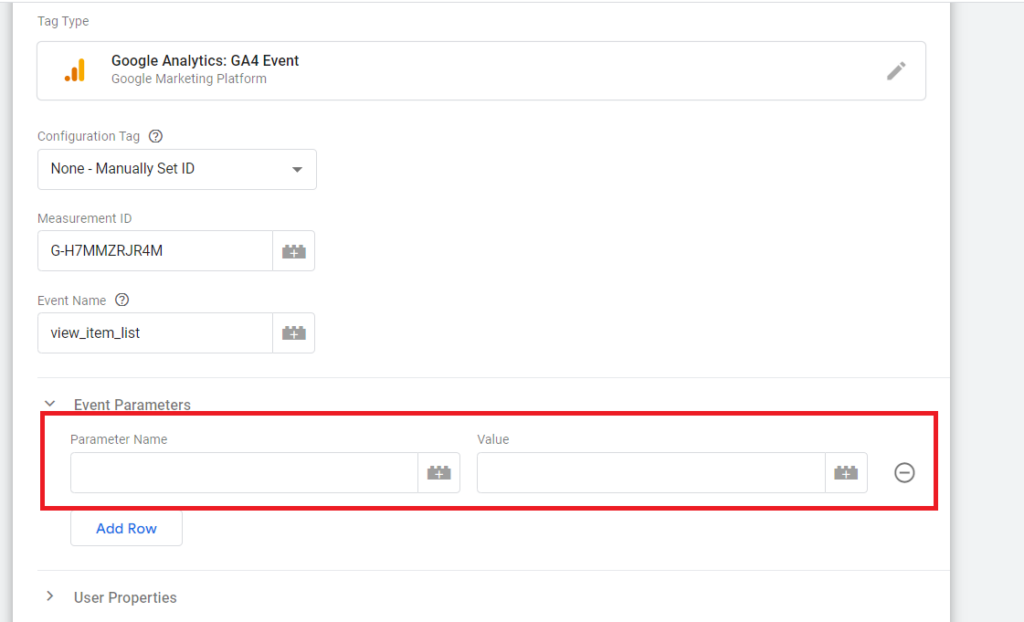
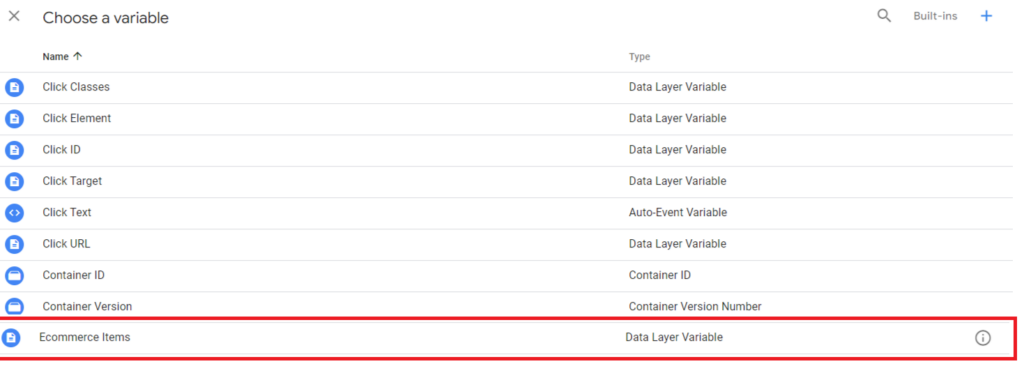
Step 12: Choose the plus sign (‘+’) underneath the ‘Value’ input field to add to the current value.
Step 13: A similar overlay to the one below will appear. The only way to know whether you’re doing something well is to look at the data. That first variable we created still stands.
Step 14: The tag configuration below will reflect your changes.
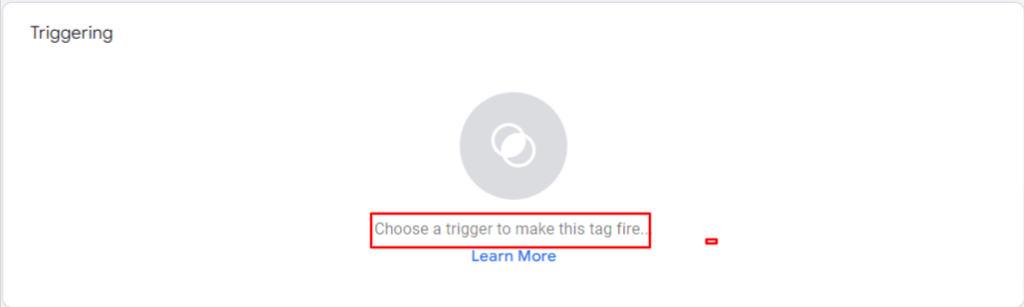
All of the steps for Google configuration are completed. It’s time to set up the trigger configuration.
Trigger Configuration
Step 15: Select a button in the “Triggering” section.
Step 16: A similar overlay to the one below will appear. If you want to add another trigger, click the plus sign.

Step 17: Name your trigger and click anywhere in the ‘Trigger Configuration’ tab.
Step 18: The following overlay will appear: Pick “Custom Event” from the drop-down menu.
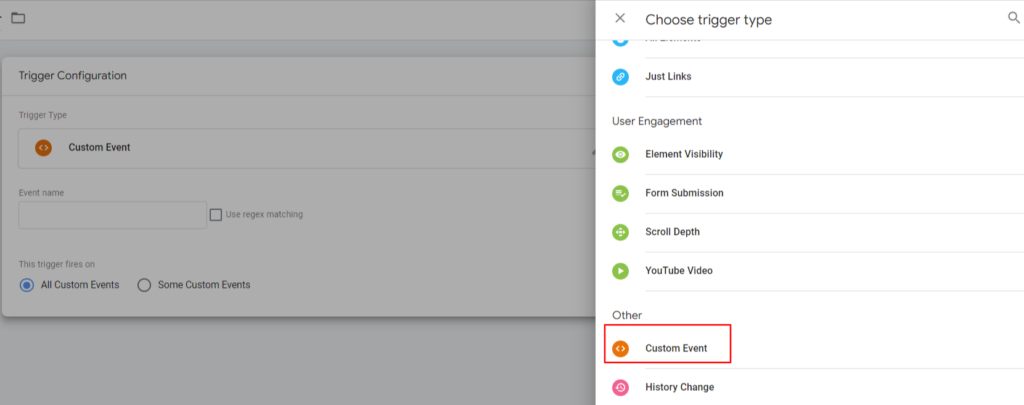
Step 19: Launching Trigger Configuration. You must enter the name of the event into the provided field. To track interest in a particular product, we use the ‘view_item_list’ action. Enter “view_item_list” when prompted.
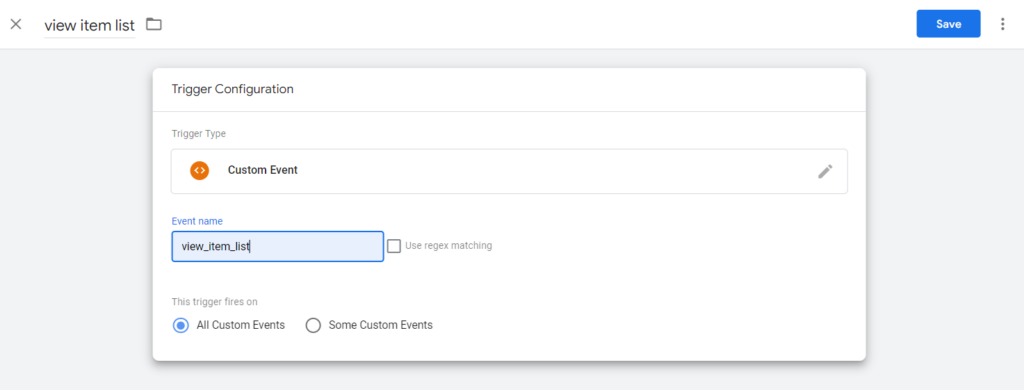
Step 20: Select “Save” from the menu.
You have just established your own GA property to commence the event. Let’s continue with others. We will simply show you the Datalayer code, final tag configuration, and trigger configuration for the remaining events, as we previously showed you how to construct it in the preceding event.
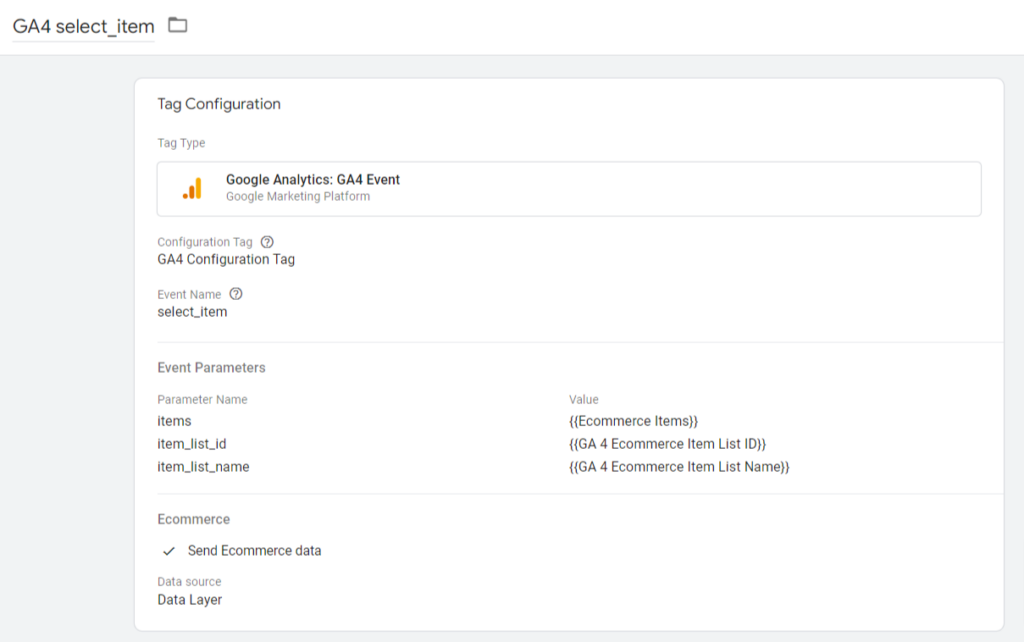
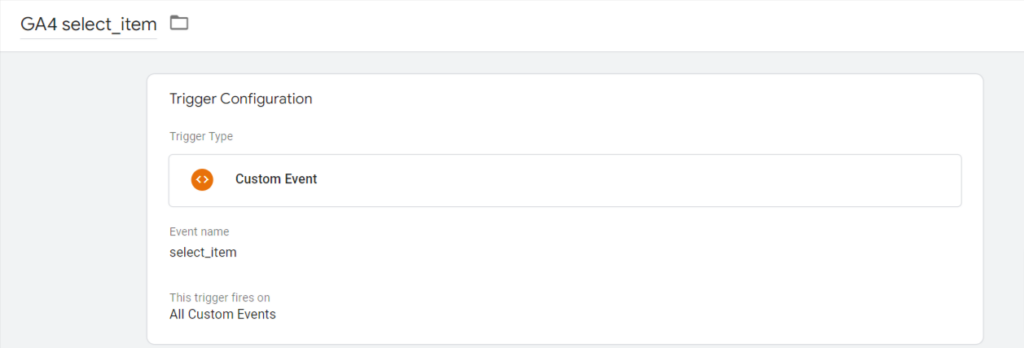
2. Product/Item select clicks
DataLayer configuration:
Pushing the product and its properties to the data layer and passing a’select_item’ event allows us to track which products users really click on.
dataLayer.push({ ecommerce: null });  // Clear the previous ecommerce object.
dataLayer.push({
  event: "select_item",
  ecommerce: {
    item_list_id: "related_products",
    item_list_name: "Related products",
    items: [
    {
      item_id: "SKU_12345",
      item_name: "Stan and Friends Tee",
      affiliation: "Google Merchandise Store",
      coupon: "SUMMER_FUN",
      discount: 2.22,
      index: 0,
      item_brand: "Google",
      item_category: "Apparel",
      item_category2: "Adult",
      item_category3: "Shirts",
      item_category4: "Crew",
      item_category5: "Short sleeve",
      item_list_id: "related_products",
      item_list_name: "Related Products",
      item_variant: "green",
      location_id: "ChIJIQBpAG2ahYAR_6128GcTUEo",
      price: 9.99,
      quantity: 1
    }
    ]
  }
});
Tag configuration in Google:
After the above code has been uploaded to the DataLayer, you may modify your GTM tag as shown below:
- Type: GA4 Event.
- Event Name: select_item
- Event Parameter (name – value): ‘items’ – {{Ecommerce Items}}
- Event Parameter (name – value): ‘item_list_id’ – {{Ecommerce Item List ID}}
- Event Parameter (name – value): ‘item_list_name’ – {{Ecommerce Item List Name}}
Data Layer Variables:-
- Variable Type: data layer variable — ‘ecommerce.items’
- Variable Type: data layer variable — ‘ecommerce.item_list_id’
- Variable Type: data layer variable — ‘ecommerce.item_list_name’
Trigger configuration:
- Trigger Type: Custom Event
- Trigger Condition: event equals ‘select_item’
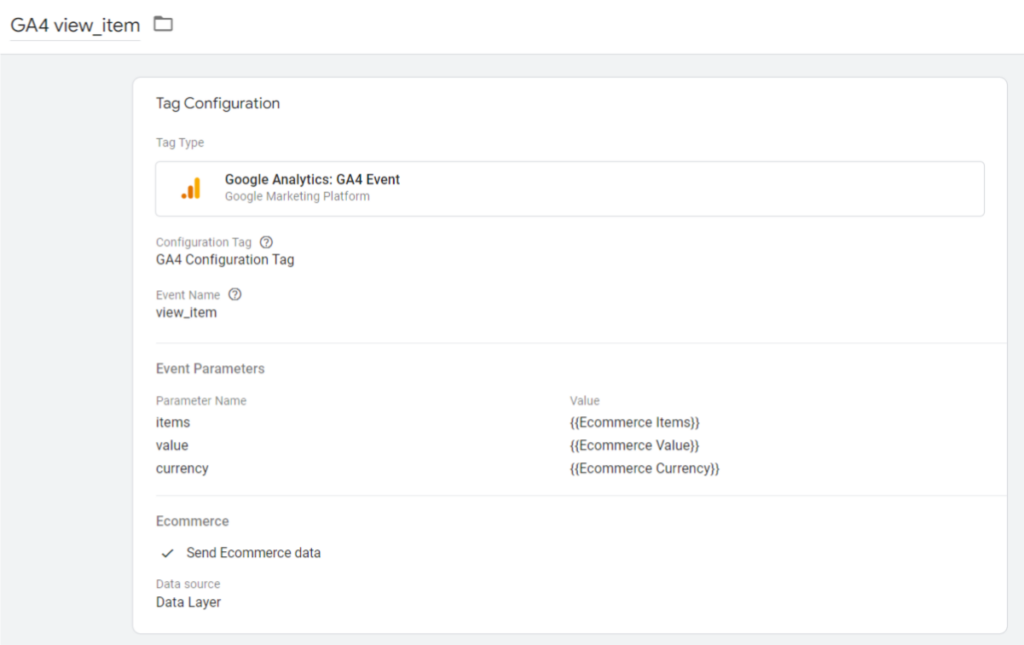
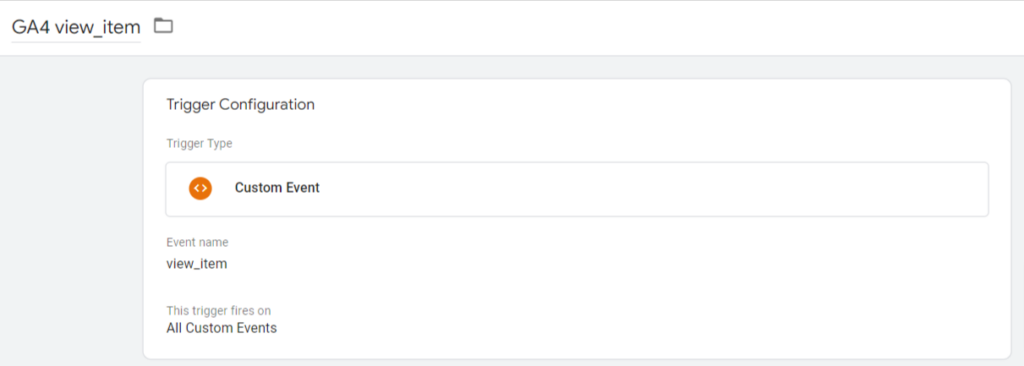
3. Product/item Detail Views
Clicks on products may be tracked by sending the product and its properties to the data layer in the form of a ‘view_item’ event.
dataLayer.push({ ecommerce: null });  // Clear the previous ecommerce object.
dataLayer.push({
  event: "view_item",
  ecommerce: {
    currency: "USD",
    value: 7.77,
    items: [
    {
      item_id: "SKU_12345",
      item_name: "Stan and Friends Tee",
      affiliation: "Google Merchandise Store",
      coupon: "SUMMER_FUN",
      discount: 2.22,
      index: 0,
      item_brand: "Google",
      item_category: "Apparel",
      item_category2: "Adult",
      item_category3: "Shirts",
      item_category4: "Crew",
      item_category5: "Short sleeve",
      item_list_id: "related_products",
      item_list_name: "Related Products",
      item_variant: "green",
      location_id: "ChIJIQBpAG2ahYAR_6128GcTUEo",
      price: 9.99,
      quantity: 1
    }
    ]
  }
});
Tag configuration in Google:
Once the code has been uploaded to the DataLayer, modify your GTM tag as shown below for all the events:
- Type: GA4 Event.
- Event Name: view_item
- Event Parameter (name – value): ‘items’ – {{Ecommerce Items}}
- Event Parameter (name – value): ‘value’ – {{Ecommerce value}}
- Event Parameter (name – value): ‘currency’ – {{Ecommerce currency}}
Data Layer Variables
- Variable Type: data layer variable — ‘ecommerce.items’
- Variable Type: data layer variable — ‘ecommerce.value’
- Variable Type: data layer variable — ‘ecommerce.currency’
Trigger configuration:
- Trigger Type: Custom Event
- Trigger Condition: event equals ‘view_item’
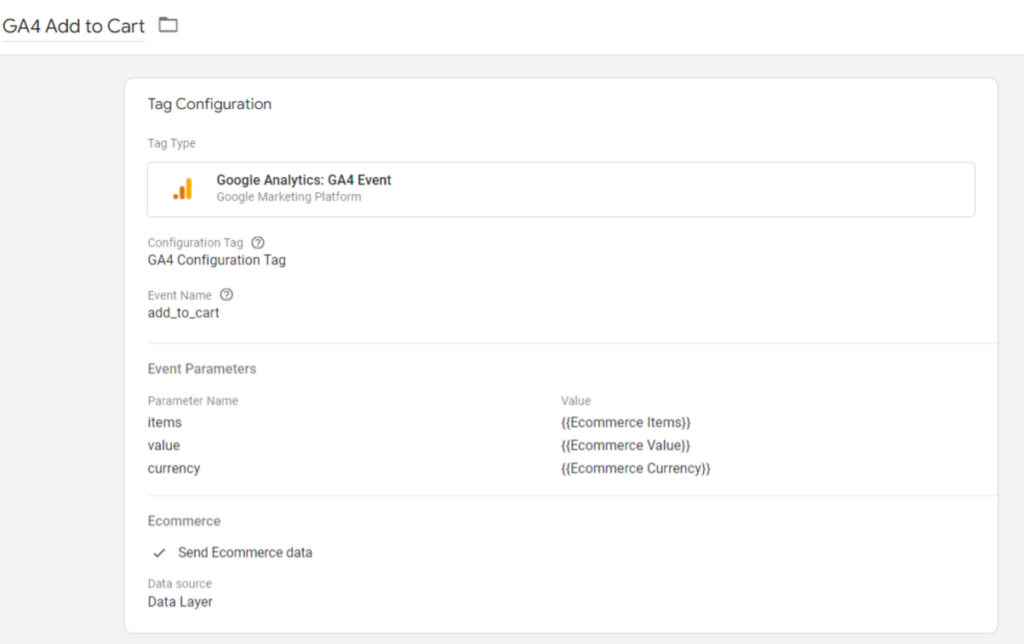
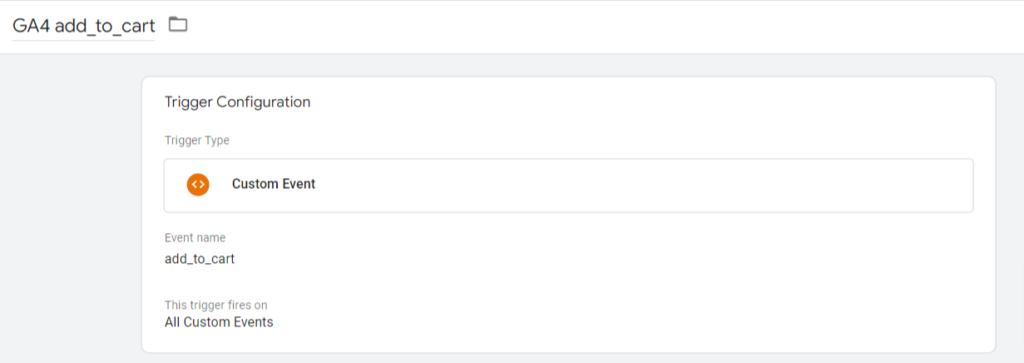
4. Add to cart
This event may be created in the same manner as an affirmation event, with the exception that the attribute passed in must be ‘add_to_cart’ and the custom event type must also be ‘add_to_cart.’
dataLayer.push({ ecommerce: null });  // Clear the previous ecommerce object.
dataLayer.push({
  event: "add_to_cart",
  ecommerce: {
    currency: "USD",
    value: 7.77,
    items: [
    {
      item_id: "SKU_12345",
      item_name: "Stan and Friends Tee",
      affiliation: "Google Merchandise Store",
      coupon: "SUMMER_FUN",
      discount: 2.22,
      index: 0,
      item_brand: "Google",
      item_category: "Apparel",
      item_category2: "Adult",
      item_category3: "Shirts",
      item_category4: "Crew",
      item_category5: "Short sleeve",
      item_list_id: "related_products",
      item_list_name: "Related Products",
      item_variant: "green",
      location_id: "ChIJIQBpAG2ahYAR_6128GcTUEo",
      price: 9.99,
      quantity: 1
    }
    ]
  }
});
Tag configuration in Google:
- Type: GA4 Event.
- Event Name: add_to_cart
- Event Parameter (name – value): ‘items’ – {{Ecommerce Items}}
- Event Parameter (name – value): ‘value’ – {{Ecommerce value}}
- Event Parameter (name – value): ‘currency’ – {{Ecommerce currency}}
Data Layer Variables
- Variable Type: data layer variable — ‘ecommerce.items’
- Variable Type: data layer variable — ‘ecommerce.value’
- Variable Type: data layer variable — ‘ecommerce.currency’
Trigger configuration:
- Trigger Type: Custom Event
- Trigger Condition: event equals ‘add_to_cart’
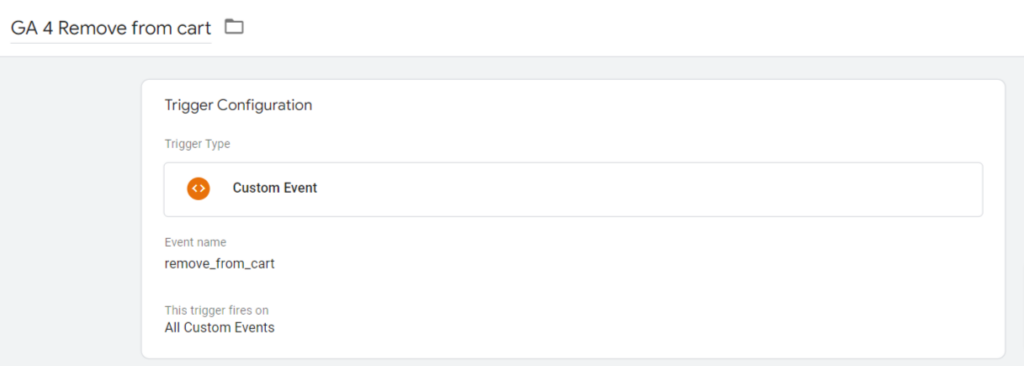
5. Remove from Cart
Pushing a product and its characteristics to the data layer and including a ‘remove_from_cart’ event allows us to track the number of times a customer deletes an item from their cart.
dataLayer.push({ ecommerce: null });  // Clear the previous ecommerce object.
dataLayer.push({
  event: "remove_from_cart",
  ecommerce: {
    currency: "USD",
    value: 7.77,
    items: [
    {
      item_id: "SKU_12345",
      item_name: "Stan and Friends Tee",
      affiliation: "Google Merchandise Store",
      coupon: "SUMMER_FUN",
      discount: 2.22,
      index: 0,
      item_brand: "Google",
      item_category: "Apparel",
      item_category2: "Adult",
      item_category3: "Shirts",
      item_category4: "Crew",
      item_category5: "Short sleeve",
      item_list_id: "related_products",
      item_list_name: "Related Products",
      item_variant: "green",
      location_id: "ChIJIQBpAG2ahYAR_6128GcTUEo",
      price: 9.99,
      quantity: 1
    }
    ]
  }
});
Tag configuration in Google:
- Type: GA4 Event.
- Event Name: remove_from_cart
- Event Parameter (name – value): ‘items’ – {{Ecommerce Items}}
- Event Parameter (name – value): ‘value’ – {{Ecommerce value}}
- Event Parameter (name – value): ‘currency’ – {{Ecommerce currency}}
Data Layer Variables
- Variable Type: data layer variable — ‘ecommerce.items’
- Variable Type: data layer variable — ‘ecommerce.value’
- Variable Type: data layer variable — ‘ecommerce.currency’

Trigger configuration:
- Trigger Type: Custom Event
- Trigger Condition: event equals ‘remove_from_cart’
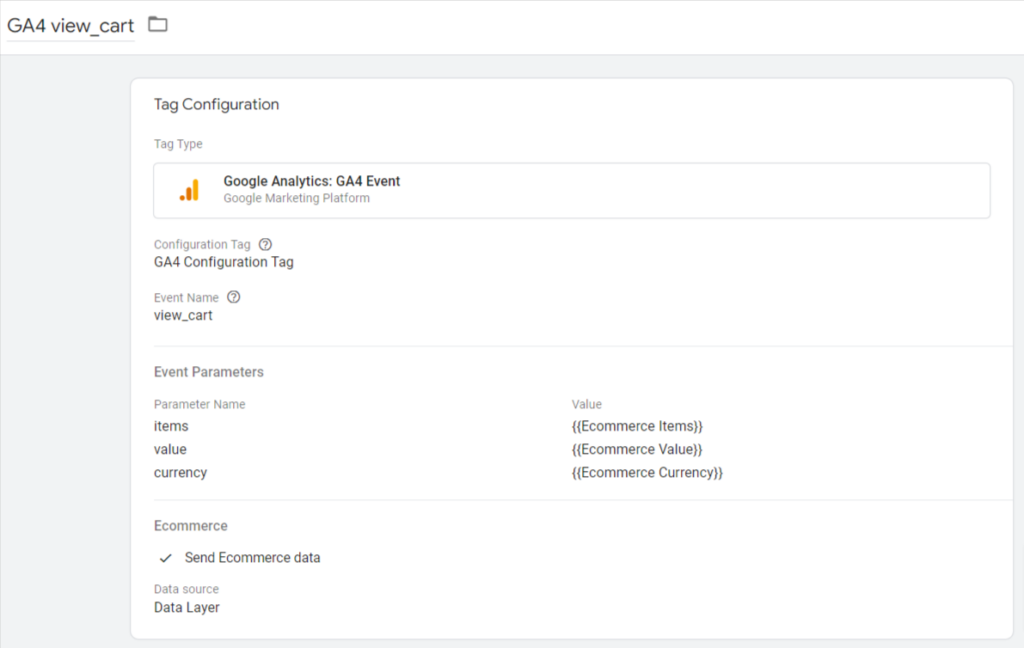
6. Views Cart
Sending the view_cart event, which includes a list of all items in the cart, allows users to verify whether or not a product was successfully added or removed from the shopping cart.
dataLayer.push({ ecommerce: null });  // Clear the previous ecommerce object.
dataLayer.push({
  event: "view_cart",
  ecommerce: {
    currency: "USD",
    value: 7.77,
    items: [
    {
      item_id: "SKU_12345",
      item_name: "Stan and Friends Tee",
      affiliation: "Google Merchandise Store",
      coupon: "SUMMER_FUN",
      discount: 2.22,
      index: 0,
      item_brand: "Google",
      item_category: "Apparel",
      item_category2: "Adult",
      item_category3: "Shirts",
      item_category4: "Crew",
      item_category5: "Short sleeve",
      item_list_id: "related_products",
      item_list_name: "Related Products",
      item_variant: "green",
      location_id: "ChIJIQBpAG2ahYAR_6128GcTUEo",
      price: 9.99,
      quantity: 1
    }
    ]
  }
});
Tag configuration in Google:
- Type: GA4 Event.
- Event Name: view_cart
- Event Parameter (name – value): ‘items’ – {{Ecommerce Items}}
- Event Parameter (name – value): ‘value’ – {{Ecommerce value}}
- Event Parameter (name – value): ‘currency’ – {{Ecommerce currency}}
Data Layer Variables
- Variable Type: data layer variable — ‘ecommerce.items’
- Variable Type: data layer variable — ‘ecommerce.value’
- Variable Type: data layer variable — ‘ecommerce.currency’
Trigger configuration:
- Trigger Type: Custom Event
- Trigger Condition: event equals ‘view_cart’

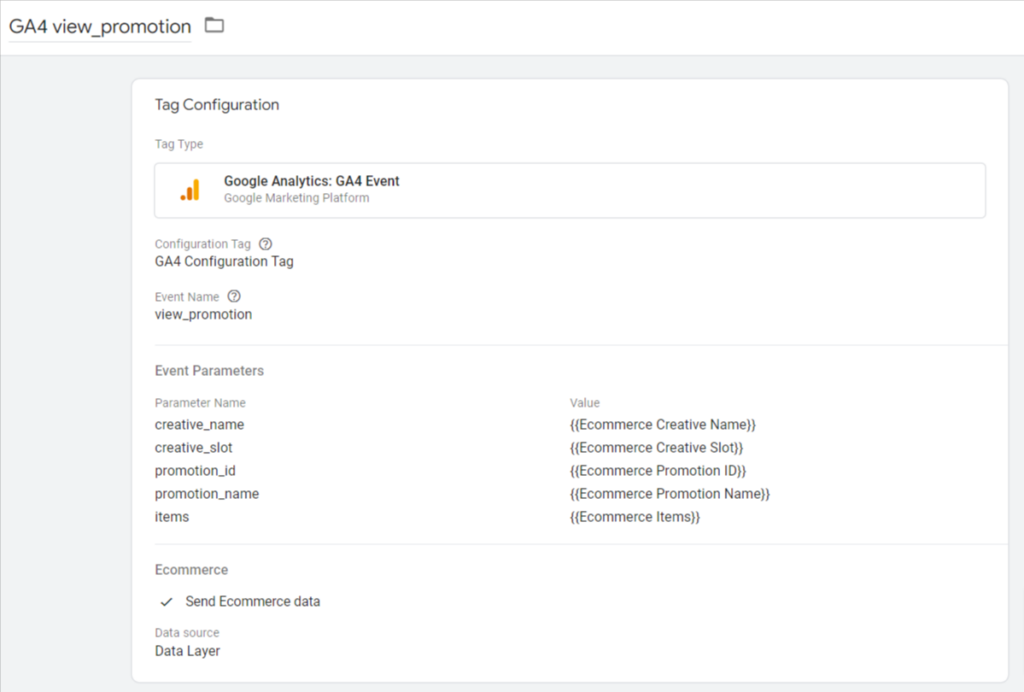
7. Promotion Views/impressions
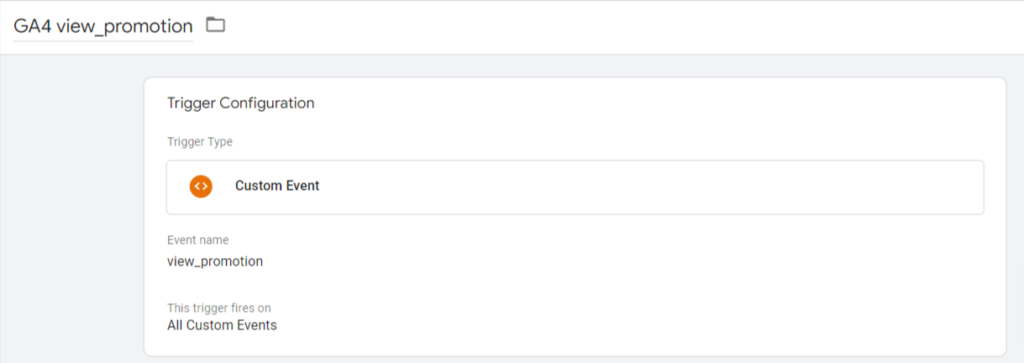
Both impressions and clicks on internal site promotions may be tracked for this occasion. Banner ads and free delivery deals are examples of these promotions. The ‘view_promotion’ event may be used to see the specifics of a promotion.
dataLayer.push({ ecommerce: null });  // Clear the previous ecommerce object.
dataLayer.push({
  event: "view_promotion",
  ecommerce: {
    creative_name: "Summer Banner",
    creative_slot: "featured_app_1",
    promotion_id: "P_12345",
    promotion_name: "Summer Sale",
    items: [
    {
      item_id: "SKU_12345",
      item_name: "Stan and Friends Tee",
      affiliation: "Google Merchandise Store",
      coupon: "SUMMER_FUN",
      discount: 2.22,
      index: 0,
      item_brand: "Google",
      item_category: "Apparel",
      item_category2: "Adult",
      item_category3: "Shirts",
      item_category4: "Crew",
      item_category5: "Short sleeve",
      item_list_id: "related_products",
      item_list_name: "Related Products",
      item_variant: "green",
      location_id: "ChIJIQBpAG2ahYAR_6128GcTUEo",
      price: 9.99,
      quantity: 1
    }
    ]
  }
});
Tag configuration in Google:
- Type: GA4 Event.
- Event Name: view_promotion
- Event Parameter (name – value): ‘creative_name’ – {{Ecommerce Creative Name}}
- Event Parameter (name – value): ‘creative_slot’ – {{Ecommerce Creative Slot}}
- Event Parameter (name – value): ‘promotion_id’ – {{Ecommerce Promotion ID}}
- Event Parameter (name – value): ‘promotion_name’ – {{Ecommerce Promotion Name}}
- Event Parameter (name – value): ‘items’ – {{Ecommerce Items}}
Data Layer Variables
- Variable Type: data layer variable — ‘ecommerce.creative_name’
- Variable Type: data layer variable — ‘ecommerce.creative_slot’
- Variable Type: data layer variable — ‘ecommerce.promotion_id’
- Variable Type: data layer variable — ‘ecommerce.promotion_name’
- Variable Type: data layer variable — ‘ecommerce.items’
Trigger configuration:
- Trigger Type: Custom Event
- Trigger Condition: event equals ‘view_promotion’
8. Promotion Clicks
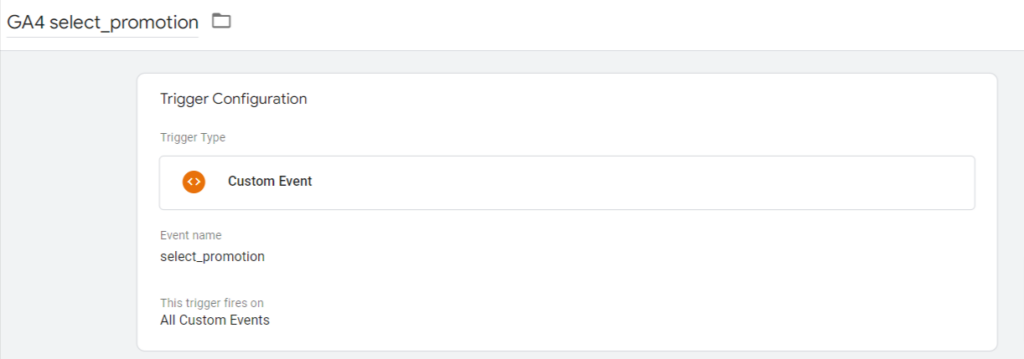
Pushing a product and its attributes to the data layer and adding a ‘promotion_clicks’ event will allow us to track promotion clicks.
dataLayer.push({ ecommerce: null });  // Clear the previous ecommerce object.
dataLayer.push({
  event: "select_promotion",
  ecommerce: {
    creative_name: "Summer Banner",
    creative_slot: "featured_app_1",
    promotion_id: "P_12345",
    promotion_name: "Summer Sale",
    items: [
    {
      item_id: "SKU_12345",
      item_name: "Stan and Friends Tee",
      affiliation: "Google Merchandise Store",
      coupon: "SUMMER_FUN",
      discount: 2.22,
      index: 0,
      item_brand: "Google",
      item_category: "Apparel",
      item_category2: "Adult",
      item_category3: "Shirts",
      item_category4: "Crew",
      item_category5: "Short sleeve",
      item_list_id: "related_products",
      item_list_name: "Related Products",
      item_variant: "green",
      location_id: "ChIJIQBpAG2ahYAR_6128GcTUEo",
      price: 9.99,
      quantity: 1
    }
    ]
  }
});
Tag configuration in Google:
- Type: GA4 Event.
- Event Name: select_promotion
- Event Parameter (name – value): ‘creative_name’ – {{Ecommerce Creative Name}}
- Event Parameter (name – value): ‘creative_slot’ – {{Ecommerce Creative Slot}}
- Event Parameter (name – value): ‘promotion_id’ – {{Ecommerce Promotion ID}}
- Event Parameter (name – value): ‘promotion_name’ – {{Ecommerce Promotion Name}}
- Event Parameter (name – value): ‘items’ – {{Ecommerce Items}}
Data Layer Variables
- Variable Type: data layer variable — ‘ecommerce.creative_name’
- Variable Type: data layer variable — ‘ecommerce.creative_slot’
- Variable Type: data layer variable — ‘ecommerce.promotion_id’
- Variable Type: data layer variable — ‘ecommerce.promotion_name’
- Variable Type: data layer variable — ‘ecommerce.items’

Trigger configuration:
- Trigger Type: Custom Event
- Trigger Condition: event equals ‘select_promotion’
9. Checkouts
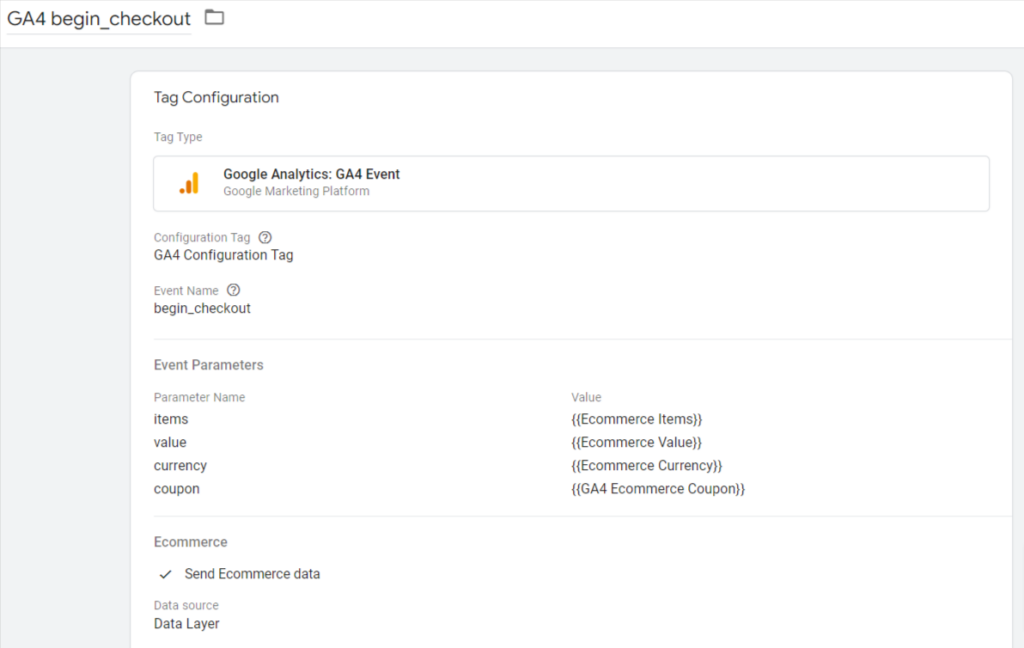
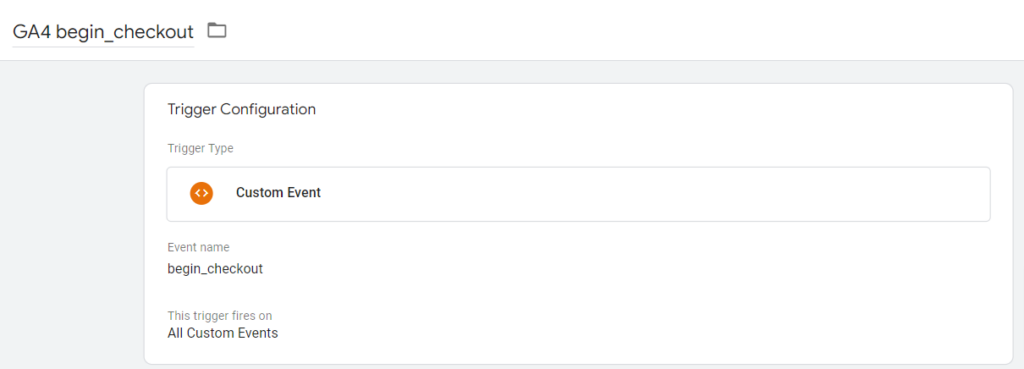
Pushing a product and its attributes to the data layer and passing a ‘begin_checkout’ event allows us to track the user’s checkout process in more detail.
dataLayer.push({ ecommerce: null });  // Clear the previous ecommerce object.
dataLayer.push({
  event: "begin_checkout",
  ecommerce: {
    currency: "USD",
    value: 7.77,
    coupon: "SUMMER_FUN",
    items: [
    {
      item_id: "SKU_12345",
      item_name: "Stan and Friends Tee",
      affiliation: "Google Merchandise Store",
      coupon: "SUMMER_FUN",
      discount: 2.22,
      index: 0,
      item_brand: "Google",
      item_category: "Apparel",
      item_category2: "Adult",
      item_category3: "Shirts",
      item_category4: "Crew",
      item_category5: "Short sleeve",
      item_list_id: "related_products",
      item_list_name: "Related Products",
      item_variant: "green",
      location_id: "ChIJIQBpAG2ahYAR_6128GcTUEo",
      price: 9.99,
      quantity: 1
    }
    ]
  }
});
Tag configuration in Google:
- Type: GA4 Event.
- Event Name: begin_checkout
- Event Parameter (name – value): ‘items’ – {{Ecommerce Items}}
- Event Parameter (name – value): ‘value’ – {{Ecommerce value}}
- Event Parameter (name – value): ‘currency’ – {{Ecommerce currency}}
- Event Parameter (name – value): ‘coupon’ – {{Ecommerce coupon}}
Data Layer Variables
- Variable Type: data layer variable — ‘ecommerce.items’
- Variable Type: data layer variable — ‘ecommerce.value’
- Variable Type: data layer variable — ‘ecommerce.currency’
- Variable Type: data layer variable — ‘ecommerce.coupon’
Trigger configuration:
- Trigger Type: Custom Event
- Trigger Condition: event equals ‘begin_checkout’
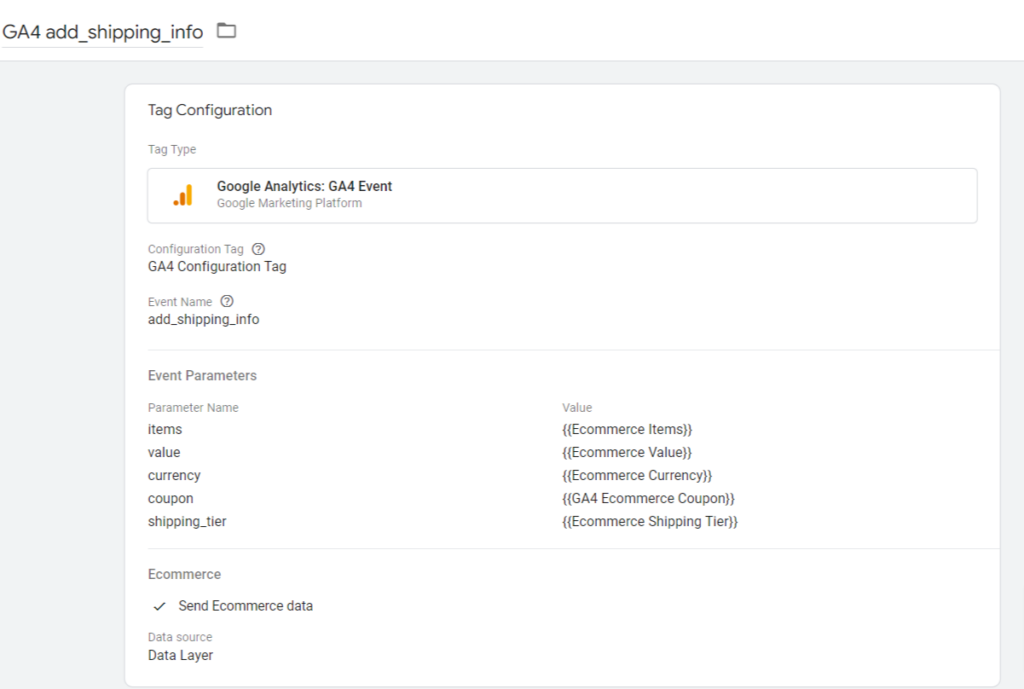
10. Add Shipping Info
Send an add_shipping_info event when a user adds shipping information on the following page of the checkout process. The user’s preferred shipping speed, such as “Ground,” “Air,” or “Next-day,” may be set using the shipping_tier parameter.
dataLayer.push({ ecommerce: null });  // Clear the previous ecommerce object.
dataLayer.push({
  event: "add_shipping_info",
  ecommerce: {
    currency: "USD",
    value: 7.77,
    coupon: "SUMMER_FUN",
    shipping_tier: "Ground",
    items: [
    {
      item_id: "SKU_12345",
      item_name: "Stan and Friends Tee",
      affiliation: "Google Merchandise Store",
      coupon: "SUMMER_FUN",
      discount: 2.22,
      index: 0,
      item_brand: "Google",
      item_category: "Apparel",
      item_category2: "Adult",
      item_category3: "Shirts",
      item_category4: "Crew",
      item_category5: "Short sleeve",
      item_list_id: "related_products",
      item_list_name: "Related Products",
      item_variant: "green",
      location_id: "ChIJIQBpAG2ahYAR_6128GcTUEo",
      price: 9.99,
      quantity: 1
    }
    ]
  }
});
Tag configuration in Google:
- Type: GA4 Event.
- Event Name: add_shipping_info
- Event Parameter (name – value): ‘items’ – {{Ecommerce Items}}
- Event Parameter (name – value): ‘value’ – {{Ecommerce value}}
- Event Parameter (name – value): ‘currency’ – {{Ecommerce currency}}
- Event Parameter (name – value): ‘coupon’ – {{Ecommerce coupon}}
- Event Parameter (name – value): ‘shipping_tier’ – {{Ecommerce Shipping Tier}}
Data Layer Variables
- Variable Type: data layer variable — ‘ecommerce.items’
- Variable Type: data layer variable — ‘ecommerce.value’
- Variable Type: data layer variable — ‘ecommerce.currency’
- Variable Type: data layer variable — ‘ecommerce.coupon’
- Variable Type: data layer variable — ‘ecommerce.shipping_tier’
Trigger configuration:
- Trigger Type: Custom Event
- Trigger Condition: event equals ‘add_shipping_info’

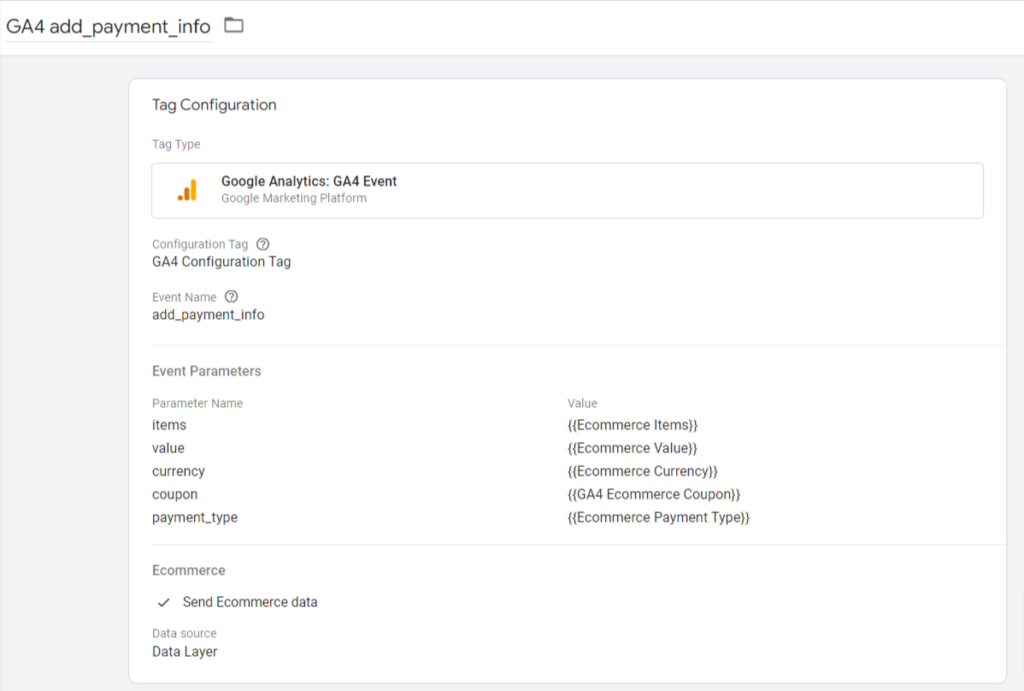
11. Add Payment Info
For users to enter their payment information, you should provide the add_payment_info event. Also, to have options for selecting a payment method, it’s better to include that information in the payment_type field of this event.
dataLayer.push({ ecommerce: null });  // Clear the previous ecommerce object.
dataLayer.push({
  event: "add_payment_info",
  ecommerce: {
    currency: "USD",
    value: 7.77,
    coupon: "SUMMER_FUN",
    payment_type: "Credit Card",
    items: [
    {
      item_id: "SKU_12345",
      item_name: "Stan and Friends Tee",
      affiliation: "Google Merchandise Store",
      coupon: "SUMMER_FUN",
      discount: 2.22,
      index: 0,
      item_brand: "Google",
      item_category: "Apparel",
      item_category2: "Adult",
      item_category3: "Shirts",
      item_category4: "Crew",
      item_category5: "Short sleeve",
      item_list_id: "related_products",
      item_list_name: "Related Products",
      item_variant: "green",
      location_id: "ChIJIQBpAG2ahYAR_6128GcTUEo",
      price: 9.99,
      quantity: 1
    }
    ]
  }
});
Tag configuration in Google:
- Type: GA4 Event.
- Event Name: add_payment_info
- Event Parameter (name – value): ‘items’ – {{Ecommerce Items}}
- Event Parameter (name – value): ‘value’ – {{Ecommerce value}}
- Event Parameter (name – value): ‘currency’ – {{Ecommerce currency}}
- Event Parameter (name – value): ‘coupon’ – {{Ecommerce coupon}}
- Event Parameter (name – value): ‘payment_type’ – {{Ecommerce Payment Type}}
Data Layer Variables
- Variable Type: data layer variable — ‘ecommerce.items’
- Variable Type: data layer variable — ‘ecommerce.value’
- Variable Type: data layer variable — ‘ecommerce.currency’
- Variable Type: data layer variable — ‘ecommerce.coupon’
- Variable Type: data layer variable — ‘ecommerce.payment_type’
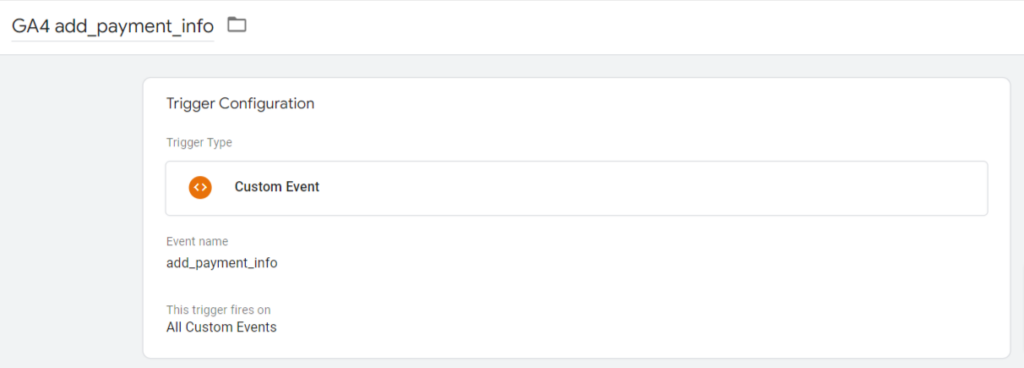
Trigger configuration:
- Trigger Type: Custom Event
- Trigger Condition: event equals ‘add_payment_info’
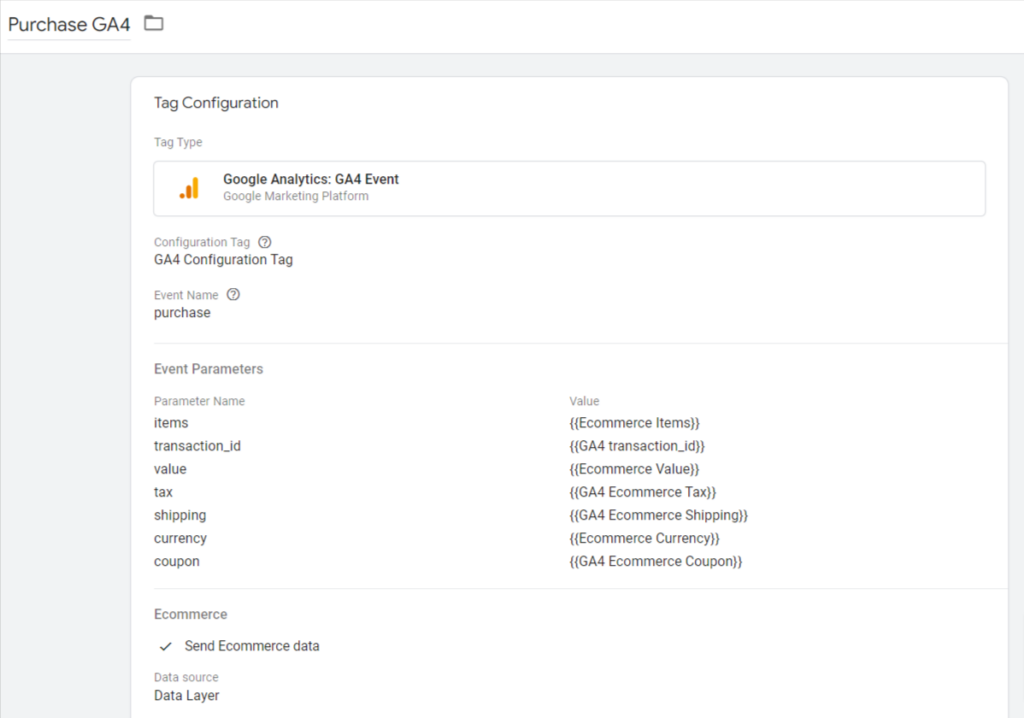
12. Purchases
In order to track sales, information about transactions, goods, and their attributes must be sent to the data layer through the thank-you page, where a ‘purchase’ event is also sent.
dataLayer.push({ ecommerce: null });  // Clear the previous ecommerce object.
dataLayer.push({
  event: "purchase",
  ecommerce: {
      transaction_id: "T_12345",
      value: 25.42,
      tax: 4.90,
      shipping: 5.99,
      currency: "USD",
      coupon: "SUMMER_SALE",
      items: [
       {
        item_id: "SKU_12345",
        item_name: "Stan and Friends Tee",
        affiliation: "Google Merchandise Store",
        coupon: "SUMMER_FUN",
        discount: 2.22,
        index: 0,
        item_brand: "Google",
        item_category: "Apparel",
        item_category2: "Adult",
        item_category3: "Shirts",
        item_category4: "Crew",
        item_category5: "Short sleeve",
        item_list_id: "related_products",
        item_list_name: "Related Products",
        item_variant: "green",
        location_id: "ChIJIQBpAG2ahYAR_6128GcTUEo",
        price: 9.99,
        quantity: 1
      },
      {
        item_id: "SKU_12346",
        item_name: "Google Grey Women's Tee",
        affiliation: "Google Merchandise Store",
        coupon: "SUMMER_FUN",
        discount: 3.33,
        index: 1,
        item_brand: "Google",
        item_category: "Apparel",
        item_category2: "Adult",
        item_category3: "Shirts",
        item_category4: "Crew",
        item_category5: "Short sleeve",
        item_list_id: "related_products",
        item_list_name: "Related Products",
        item_variant: "gray",
        location_id: "ChIJIQBpAG2ahYAR_6128GcTUEo",
        price: 20.99,
        promotion_id: "P_12345",
        promotion_name: "Summer Sale",
        quantity: 1
      }]
  }
});
Tag configuration in Google:
- Type: GA4 Event.
- Event Name: purchase
- Event Parameter (name – value): ‘items’ – {{Ecommerce Items}}
- Event Parameter (name – value): ‘transaction_id’ – {{Ecommerce transaction_id}}
- Event Parameter (name – value): ‘value’ – {{Ecommerce Value}}
- Event Parameter (name – value): ‘tax’ – {{Ecommerce Tax}}
- Event Parameter (name – value): ‘shipping’ – {{Ecommerce Shipping}}
- Event Parameter (name – value): ‘currency’ – {{Ecommerce Currency}}
- Event Parameter (name – value): ‘coupon’ – {{Ecommerce Coupon}}
Data Layer Variables
- Variable Type: data layer variable — ‘ecommerce.items’
- Variable Type: data layer variable — ‘ecommerce.transaction_id’
- Variable Type: data layer variable — ‘ecommerce.value’
- Variable Type: data layer variable — ‘ecommerce.tax’
- Variable Type: data layer variable — ‘ecommerce.shipping’
- Variable Type: data layer variable — ‘ecommerce.currency’
- Variable Type: data layer variable — ‘ecommerce.coupon’
Trigger configuration:
- Trigger Type: Custom Event
- Trigger Condition: event equals ‘purchase’
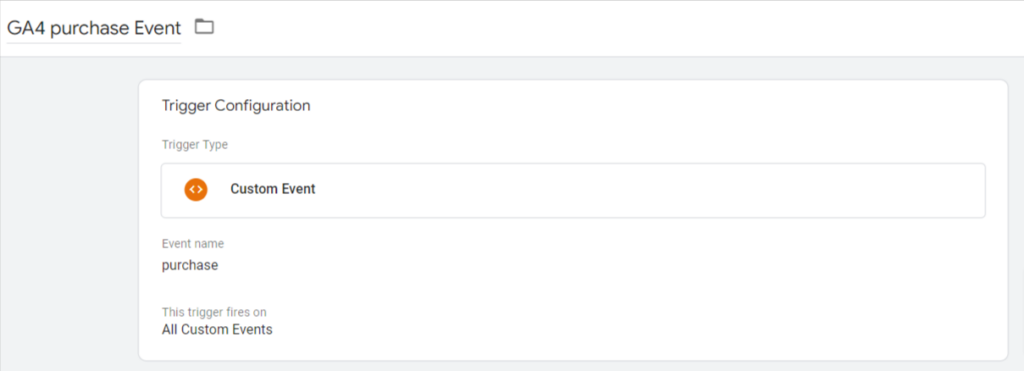
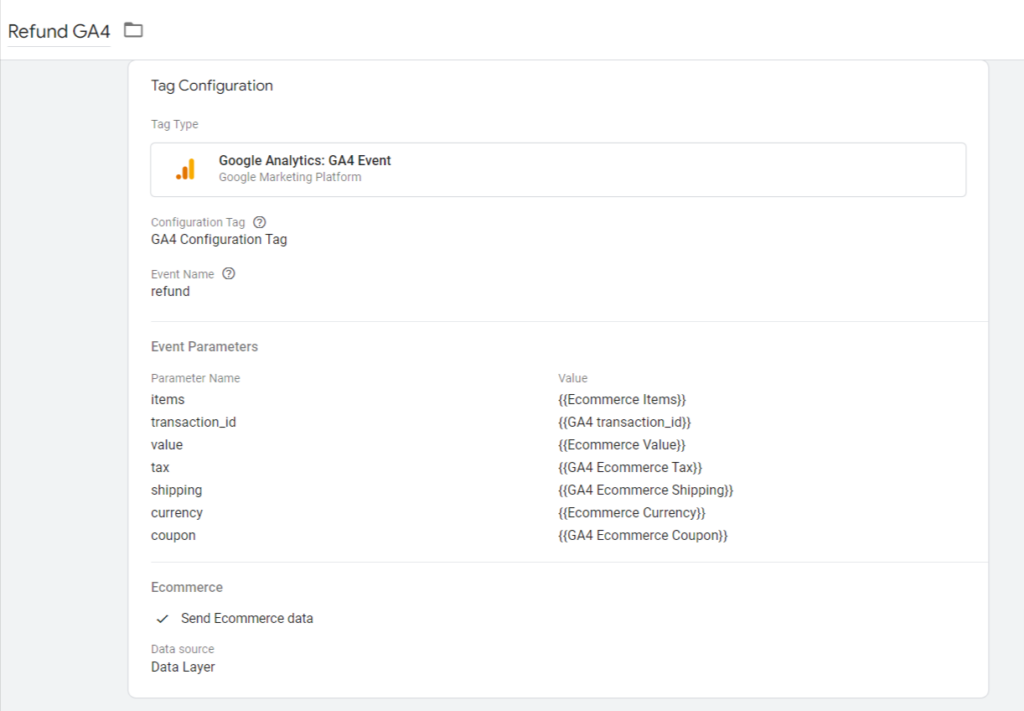
11. Refunds
To track refunds, information about completed transactions must be sent to the data layer through the thank-you page and a ‘refund’ event.
Tag configuration in Google:
- Type: GA4 Event.
- Event Name: refund
- Event Parameter (name – value): ‘items’ – {{Ecommerce Items}}
- Event Parameter (name – value): ‘transaction_id’ – {{Ecommerce transaction_id}}
- Event Parameter (name – value): ‘value’ – {{Ecommerce Value}}
- Event Parameter (name – value): ‘tax’ – {{Ecommerce Tax}}
- Event Parameter (name – value): ‘shipping’ – {{Ecommerce Shipping}}
- Event Parameter (name – value): ‘currency’ – {{Ecommerce Currency}}
- Event Parameter (name – value): ‘coupon’ – {{Ecommerce Coupon}}
Data Layer Variables
- Variable Type: data layer variable — ‘ecommerce.items’
- Variable Type: data layer variable — ‘ecommerce.transaction_id’
- Variable Type: data layer variable — ‘ecommerce.value’
- Variable Type: data layer variable — ‘ecommerce.tax’
- Variable Type: data layer variable — ‘ecommerce.shipping’
- Variable Type: data layer variable — ‘ecommerce.currency’
- Variable Type: data layer variable — ‘ecommerce.coupon’
Trigger configuration:
- Trigger Type: Custom Event
- Trigger Condition: event equals ‘refund’
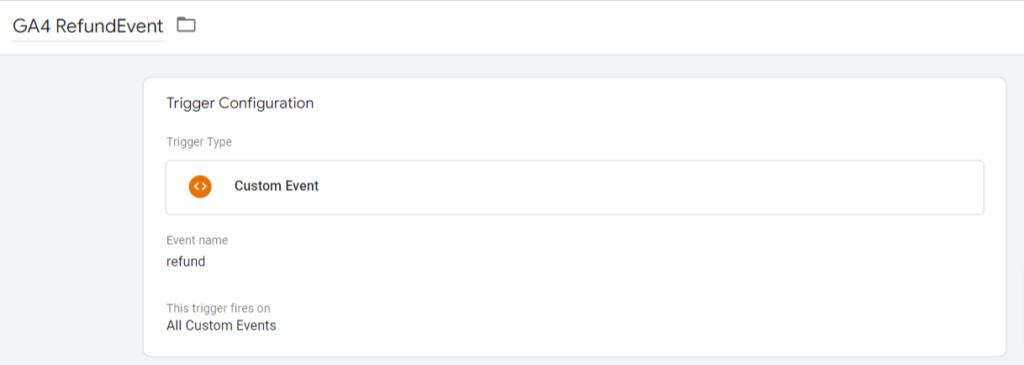
All other trigger and Google Tag Manager configurations will continue functioning similarly for all events. That’s everything for the Google Analytics 4 setup process.
Troubleshooting Common Issues with GA4 eCommerce Tracking via GTM Best Practices
eCommerce tracking is vital for knowing how your online store is doing. You want to monitor the revenue or potential to gain more, the conversion rate, and other activities.
But setting up eCommerce tracking can get tricky. You might run into some issues depending on factors like the platform you’re using for your online store, the website template, and how you’ve set up GA4. We’re here to help you troubleshoot those common problems and give you some best practices for GA4 eCommerce tracking via GTM.
Check the Data Layer
For Google Analytics ecommerce monitoring to work, you’ll need a comprehensive data layer detailing your transactions. Utilize a tool like Google Tag Assistant to check the data layer. Contact the developers for help with the data layer implementation if the purchase event is absent.
Ensure you include currency, transaction ID, value, and an item array. Verify that additional e-commerce events, such as “adding to cart,” are also delivered to the data layer; for help with implementation, visit developers or Google’s documentation.
Also, contacting the theme developer of your website is the best way to fix problems caused by simultaneous add-to-cart events.
Event Triggers
After setting up the data layer, check Google Tag Manager triggers like buttons or links clicks and form submissions.
When configuring GA4 for e-commerce tracking, be careful to:
- Make sure you successfully send the purchase event to the data layer.
- Use a single trigger in Google Tag Manager to determine all e-commerce events. Individual triggers may be established for each occurrence if desired.
- Verify and set up the trigger in Google Tag Manager. Check that the trigger activates the tag by performing a test transaction.
- Use Tag Assistant to validate proper tag firing. The buying event has to be shown.
- Double-check the trigger configuration if the tag doesn’t activate and ensure the purchase event is set up correctly. For data to be sent to Google Analytics, the data layer implementation and the trigger configuration are necessary.
Ensure the container installed is correct
Validate that your website uses the latest version of Google Tag Manager and the suitable container. The data layer event will remain visible if the incorrect container is in place. Still, the container’s trigger won’t fire, and the tag won’t report any activity to Google Analytics.
Best Practices for GA4 eCommerce Tracking via GTM
Follow these best practices to achieve accurate and effective GA4 ecommerce tracking through Google Tag Manager (GTM). These guidelines ensure the precise capture of your eCommerce data, providing valuable insights into your online store’s performance. From configuring tags and triggers correctly to accurately mapping eCommerce data, following these best practices empowers you to optimize GA4 eCommerce tracking and make informed decisions for your business.
Use GTM’s preview and debug mode
For accurate data capture, regularly checking eCommerce tracking implementation is essential. If GA4 isn’t correctly receiving data ultimately, use GTM’s preview and debug mode feature to troubleshoot.
Deeply understand your customer’s journey
The custom parameters feature in GTM’s data layer presents several parameters to know how your users purchase on your website or app. You can get closer to converting more customers using uncommon but advanced parameters.
Regular Maintenance and Updates
To make the most of the latest features, bug fixes, and performance enhancements, keep your Google Tag Manager (GTM) and GA4 versions up to date. By staying current, you can take advantage of the latest developments to enhance your eCommerce tracking efforts. It’s also crucial to periodically review and update your eCommerce tracking implementation as your website evolves.
Gain comprehensive insights into your customers’ purchase behavior by regularly monitoring GA4 eCommerce suggestions. By staying proactive and ensuring your tracking setup aligns with the changes on your website, you can maintain accurate and reliable eCommerce tracking data.
Advanced Tips and Tricks for Optimizing GA4 eCommerce Tracking via GTM
Find how you’re losing customers
Event Funnel Analysis is like having a map showing your customers’ journey on your website. It helps you understand how they move from one step to another, like adding items to their cart, entering their payment information, and completing a purchase. Using GA4, you can create custom funnels that track these steps and see where people might need help or leave your website without purchasing. This information is valuable because it allows you to improve your website or adjust your marketing strategies to make it easier for customers to buy from you.
Personalized suggestions based on previous site interactions
You can personalize your ads based on user interactions and eCommerce data. Imagine knowing about your customer’s last browsing details to suggest better precisely what they’re looking for. You can use GTM to implement dynamic remarketing tags to display personalized and the most relevant products.
Specific events tracking
Custom event tracking maps to your eCommerce goals. Implementing custom events in GTM and GA4 allows you to follow particular actions and behaviors on your website. It goes beyond the standard eCommerce events and provides valuable insights for optimization. Now make data-driven decisions based on real-world situations.
Conduct A/B Testing for best results
Picture GTM’s A/B testing capabilities as your laboratory for eCommerce tracking. It’s like conducting experiments to find the winning formula. With GTM, you can test tracking configurations, event triggers, or marketing strategies to see which performs best. It’s an opportunity to compare and analyze various approaches, uncovering the ones that drive better results. It’s like being a scientist in your digital lab, constantly iterating and refining your tracking methods.
User Lifetime Value (LTV) Tracking
Tracking your customers’ lifetime value helps paint a picture of your marketing efforts. It’s like having a navigation system that shows each customer’s long-term value. By implementing LTV tracking in GTM, you can capture crucial customer data, such as repeat purchases, average order value, and customer retention. This information acts as a roadmap, helping you optimize your marketing strategies and focus on high-value customers. It’s like having a compass that leads you to your most valuable customers, enabling you to build stronger relationships and drive business growth.
In conclusion, GA4 ecommerce tracking and Google Tag Manager offer powerful tools for online businesses to understand and optimize their performance. By implementing ecommerce tracking, you can gain valuable insights into your customers’ behavior, track important metrics like revenue and conversion rate, and identify areas for improvement.
With the step-by-step instructions, you can easily set up GA4 ecommerce tracking using Google Tag Manager and map your eCommerce data to GA4 parameters. Troubleshooting common issues and following the best practices ensure that your tracking is accurate and reliable.
Additionally, advanced tips and tricks allow you to optimize your eCommerce tracking further and unlock its full potential. So, whether you’re a small online store or a larger eCommerce platform, utilizing GA4 and Google Tag Manager can help you enhance your understanding of your customers, improve your website’s performance, and drive better results for your business.
FAQs
To track eCommerce in Google Analytics 4 (GA4), you need to set up an eCommerce data stream, install the GA4 tracking code on your website, configure eCommerce parameters, enable enhanced eCommerce reporting, test and validate the tracking, and then analyze the eCommerce data. First, create an eCommerce data stream in your GA4 property and provide the necessary information about your eCommerce platform.
Install the GA4 tracking code on your website and ensure it captures the required eCommerce parameters such as product ID, name, price, quantity, and transaction ID. Enable enhanced eCommerce reporting in your property settings to collect more detailed data on eCommerce actions. Test the tracking by performing transactions on your website and verify events recorded in real time. Finally, analyze the eCommerce data using GA4’s reporting features to gain insights into your sales performance, revenue, and other vital metrics.
To enable eCommerce tracking in GA4, you need to configure it based on your website’s implementation of Google Analytics. Using Google Tag Manager, you can utilize the data layer to capture transaction details and send them to GA4.
First, modify the GA4 Configuration tag in Google Tag Manager to include eCommerce tracking by creating a new tag specifically for eCommerce events. Then, set up triggers to fire the tag for relevant eCommerce actions and enable the “Send Ecommerce Data” option to capture the details from the data layer. Suppose you’re not using Google Tag Manager and instead using Google Tag (gtag.js). In that case, you’ll need to modify the code on the page where the transaction occurs and populate the transaction details using appropriate variables. Remember to consult platform-specific documentation or support for implementing eCommerce tracking correctly.